Waffle Flower— Oversized Postage
Hello!!
Today I’m sharing the blog post on two cards featuring the Oversized Postage bundle from Waffle Flower! If you haven’t seen it yet, the June release from Waffle Flower is packed full of all kinds of goodies, and one of my favorites is this bundle!
Colorful Birthday Postage
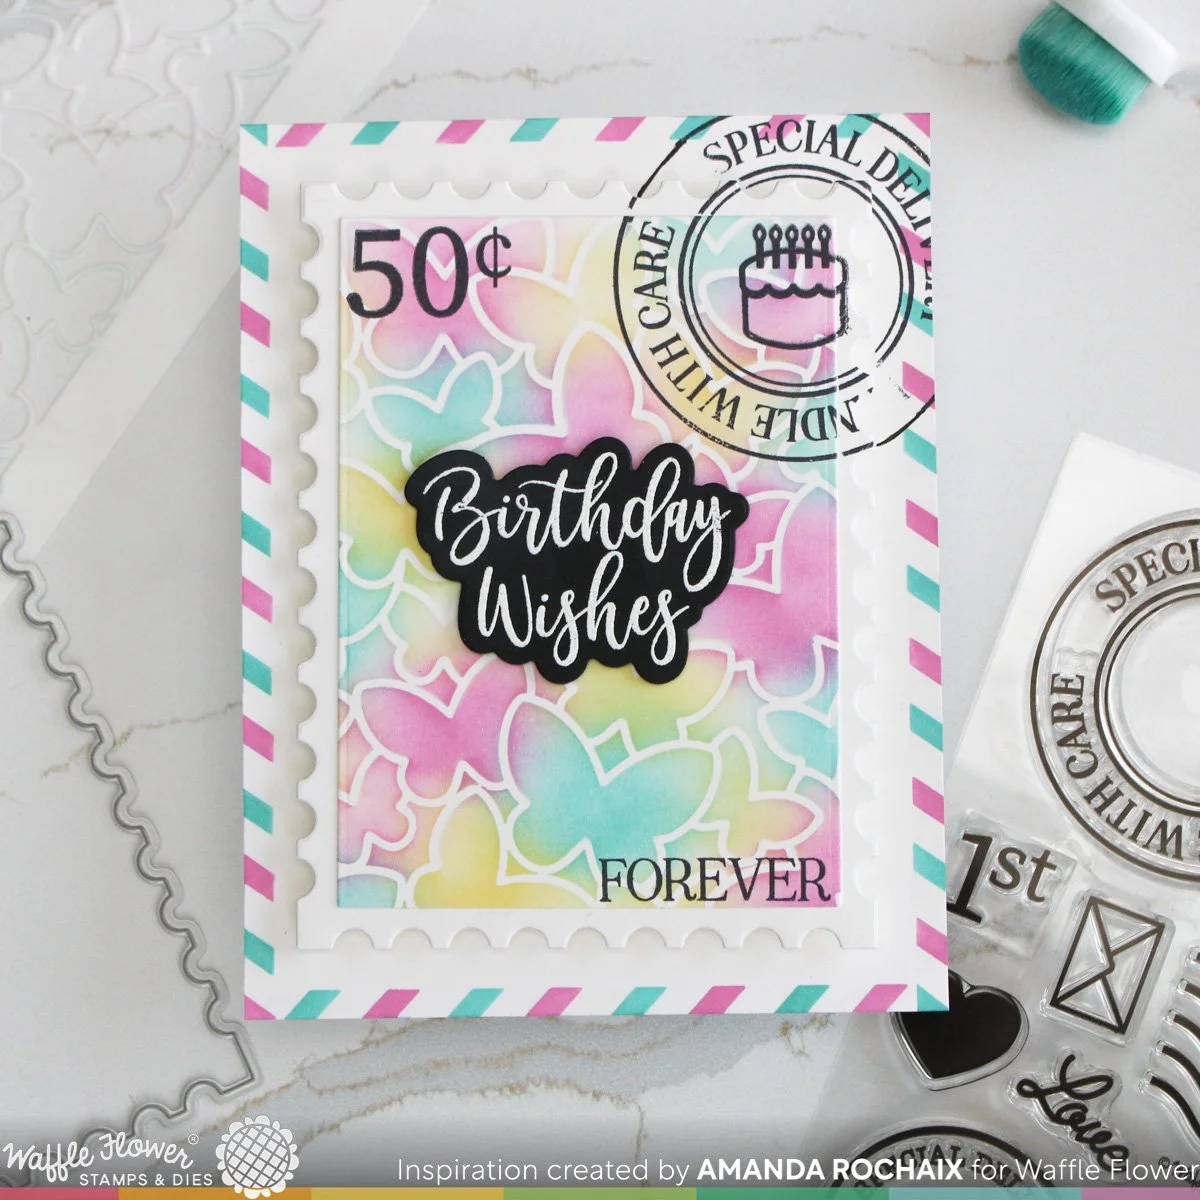
Isn’t this card so sweet?! I knew I wanted to use the new Butterfly Background stencil on this card, so I pulled out some happy colors—Buttercup, Oceanside and Sweet Pea inks from Concord & 9th. I’ve been really into spotlight blending on stencils like this (you’ll see in another post!), so I decided to randomly blend the three colors across the butterflies on an A2-sixed piece of cardstock. I love the spots where the colors overlap and create new ones—so fun! Once I was done with my blending, I used the rectangle die in the set to cut out my postage design. Since I was already doing some die cutting, I used the ruffled postage die and cut it out of some white cardstock.
Noticing the scale of the postage stamp vs. my A2 panel, I thought it would be fun to make the edge of it fancy and really lean into that postage vibe. I pulled out the Postage Collage Coloring Stencil and used the same Oceanside and Sweet Pea inks to blend on the little stripey detail, and I love how this looks!
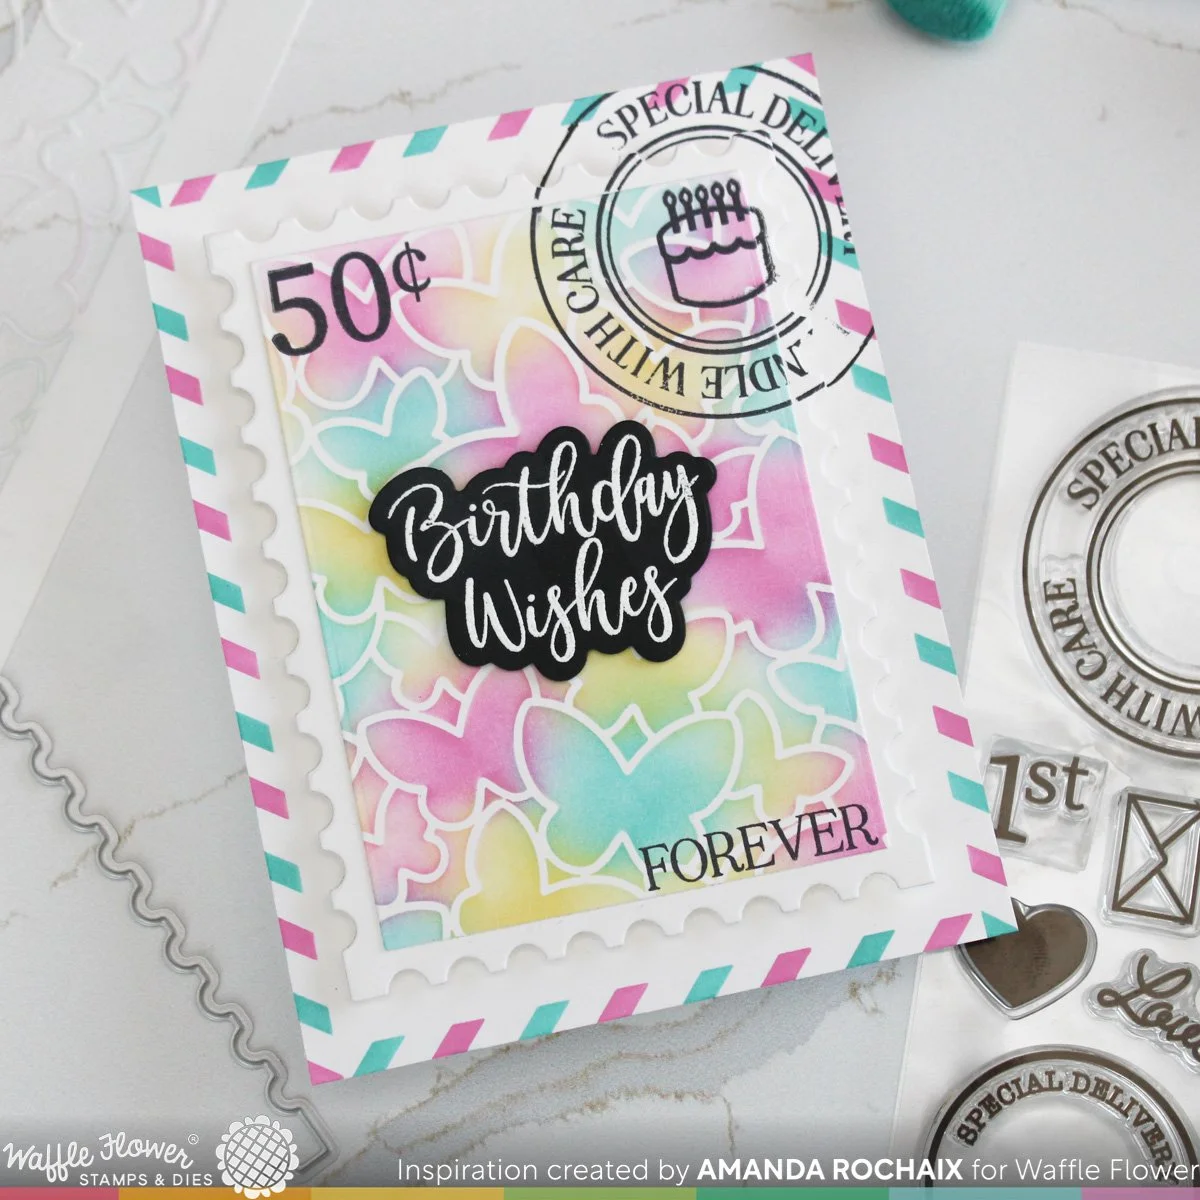
Since things were mostly done, it was time to add postage details using the Oversized Postage stamp set! I wanted to use the ‘handle with care’ postage cancellation stamp, but I wanted it to hang off the card a bit to make things a little more fun. I lined the postage stamp panel up where I would stick it down (I didn’t because I wanted to pop it up on foam tape), and I pulled out my Jet Black fresh dye ink from Altenew and stamped the cancellation mark. It’s not a perfect stamping, I touched the line up a little bit with a micron pen, but it works for me! I added the little birthday cake stamp in the empty space in the postmark to really drive home the birthday card vibe, then added a ‘forever’ and 50-cent stamped detail in two corners of the butterfly stamp.
With everything ready to assemble, I popped my butterfly stamp up on some 1/8-th inch foam tape from Waffle Flower and stuck it down on the center of my card, using the postmark detail in the upper right corner to help guide me. To finish this card off, I added a sentiment I had from my stash— ‘birthday wishes’ from the Essential Celebrations stamp set. I think this sentiment worked out pretty perfectly on this cheerful card!
Postage Stamp Collage
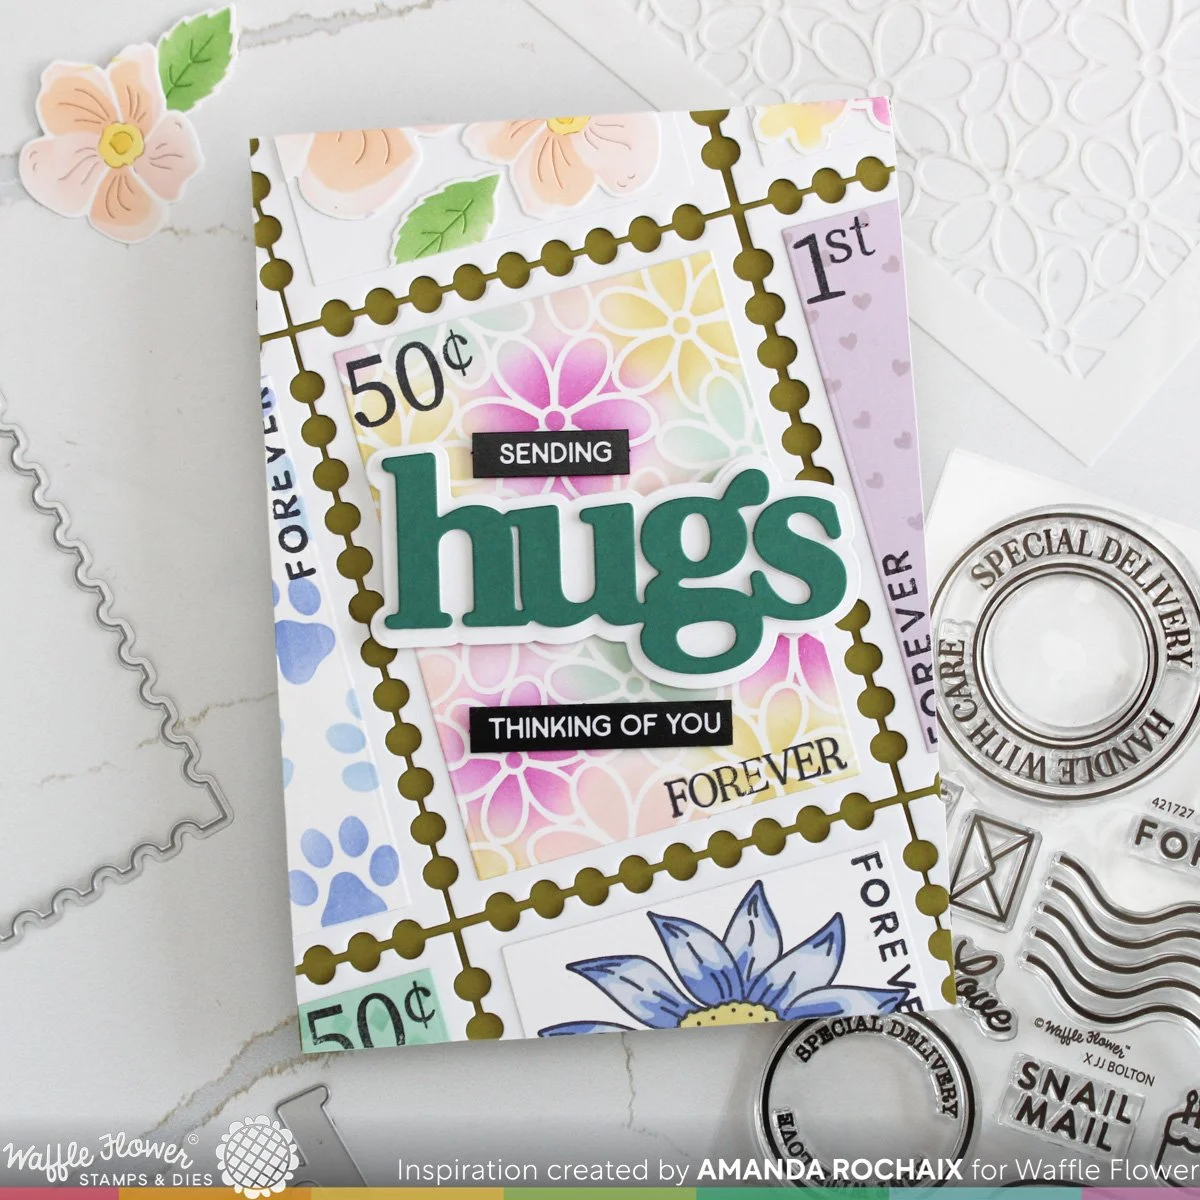
Okay, so on this one I had a lot of fun, some might say I’m toeing the line of too much fun, but I love how this card turned out! My favorite thing about this bundle is that you can literally make any type of stamp you want, and I really leaned into that here! In this card I pretty much used every product from the new release with the exception of a previously released stencil and greeting. So, let’s get into the details!
I am absolutely in love with the new Daisy Background stencil, and that really drove this card. I wanted to blend it in the same spotlight fashion as the previous card, but I wanted a fun color palette that was a little different from another card you’ll be seeing soon. I pulled out a tried and true palette—Sea Glass, Honeycomb, Dragonfruit, and Nectar inks from Concord & 9th and blended them onto a piece of C9 white cardstock that I die cut using the rectangle from the die set. I die cut the ruffle stamp edge die out of plain white cardstock (a very low weight that I use to build dimension) since I didn’t want to use so much of my ‘good’ cardstock, and glued my blended panel on top of it. At this point, I became paralyzed wondering if I should make all my other stamps in the same color palette, but I really wanted this card to feel like this really cool postage puzzle I have, so I tried not to think too hard on the rest of my choices and just let them come to me.
The next stamp I made was the lilac one to the left using Lilac cardstock from C9 and blending on Lilac hearts using the coordinating ink and the new Random Heart stencil. I love how sweet this stamp turned out! I backed it with a stamp ruffle die cut, then set it aside to move on to the next. I knew I wanted to include one of the sketched florals, so after figuring out which one I could see the most of in my postage stamp, I settled on the Sketched Aster which I stamped in Jet Black ink on C9 white cardstock that I cut out using the rectangle from the die set. I went with the same colors I used on a previous card, and blended on Water Hyacinth for my lightest layer, Alpine Aster for my mid-tone, and Crystal Violet for my darkest color (these are all fresh dye inks from Altenew). For the flower center, I blended on Honeycomb and Stardust ink from Concord & 9th, and since I was thinking this stamp would be on the bottom of my card, I decided not to blend the greenery.

I wanted to squeeze in some of the Layered Flower Duo die-n-stencil flowers on this card, and since I had some left over from a previous card, I decided to use them here. These flowers were blended with Nectar and Creamsicle inks for the flower petals, Buttercup and Sunflower for the flower centers, and Parsley ink for the leaves (all of these inks are from Concord & 9th). I arranged the flowers on a white background rectangle, and once I was happy with my arrangement I glued them down. At this point, I was realizing in order to see as many stamps as possible I would definitely need to create a 5 x 7-inch card, so I cut a card base out of Grasshopper cardstock from Concord & 9th. Getting the stamps laid out, I realized I could fit three more partial ones on, and two that are only ruffle detail pieces.
At this point, I decided to pull in Sea Glass cardstock in the lower corner to pull back to the floral stamp. I ended up using the Random Rhombus stencil and Sea Glass ink for a nice tone-on-tone pattern. I needed another stencil that would fill in a bit more space on a stamp, and after searching through my stash, I pulled out the Paw Print Stencil Duo stencil set. To kinda keep things a bit cohesive, I decided to use two of the same inks I used on the Aster stamp: Water Hyacinth and Alpine Aster fresh dye inks. This stencil does have two layers, but I only used the main one (the second one adds shadow to the side of the pawprint) and randomly bounced between the two ink colors.
For my last stamp things are a little funky! My mom was over while I was crafting, and she decided to fussy cut out scraps of a blended panel that I used the Butterfly Background stencil on. Since I needed just a small area filled, I took one of the pieces she cut out then glued it onto a white rectangular and popped the whole thing on a stamp ruffle die cut (I still don’t know what to call this haha!).
With my stamps all figured out, all I had to do next was nail down my layout. To make things a little interesting and to get as many stamps on my cardfront as possible, I started out by putting my floral stamp panel at an angle then building around it. Once I was happy with how things were, I popped each stamp up on thin foam squares from Simon Says Stamp, stuck them down and trimmed off the excess. At this point I knew I wanted to use the Oversized Hugs Print die and that I wanted to pair it with some sentiments from the Subsentiments Care diecut (I’ve said it before and I’ll say it again, I love these things!). With that in mind, I decided to die cut the ‘hugs’ out of Juniper cardstock since I would be placing the sentiment over the floral stamp, and Juniper plays so well with that color palette. Once I loosely figured out where the sentiment was going to sit, I got to stamping the postage details on each stamp, varying the placements, fonts and phrases using Jet Black ink from Altenew.
To wrap everything up, I popped the ‘hugs’ up on thick foam squares, and the subsentiments up on thin foam squares. Isn’t this card so fun?! It’s kind of wild, but I think it might be my favorite that I’ve created for this release.
That’s all I’ve got for you today! I hope to catch you next time with more inspiration!😊
Affiliate disclaimer: all links to Waffle Flower, Altenew, Scrapbook.com, and Spellbinders products are affiliate links. These links allow me to get a commission at no extra cost to you if you use them to shop! All other links provided are links to supplies and shops I am not affiliated with and I do not get a commission from.