

Pretty Pink Posh—Layered Candles Birthday Cards

Hi crafters!
Last week I gave myself a bit of time to grieve, so I wasn’t feeling very crafty or motivated/inspired. However, when I started to feel motivated, all I could think about was stenciling to get my crafty mojo back. Like emboss resist, stenciling is another thing that I love doing when I’m not feeling super inspired and don’t know what to do in my craft room, or when I just want to get crafting and don’t want to think too much. So, today I’m back with some quick and easy birthday cards featuring the Layered Candles stencil from Pretty Pink Posh.
Blue Birthday Card

I love this card! Blue tones are some of my favorites (especially Concord & 9th blue inks), and I love how this card can flex to be perfect for a blue lover, or as a masculine birthday card! For this card I pulled out Sea Glass, Aqua Sky, Oceanside, and Peacock inks from Concord & 9th to make a sort of ombre-like gradient of candles. I lined up the second stencil to add details to the candles and blended them in the same color of ink but with a heavier hand, and I finished the candles off by blending Buttercup ink for the flames.
I used my Waffle Flower Nesting Rectangles dies to cut off 1/4-inch from each side of the panel, but I shifted the die up toward to the top of my stenciled panel so that the first row of candles on the card front would have flames. I matted the stenciled panel on a piece of Peacock cardstock that I ran thru my die cut machine with the Stitched Stripe card front from Concord & 9th. I like the texture this adds to the card!
Lastly, I got to work on the greeting. I had recently picked up the Make a Wish die from Simon Says Stamp, and I really love it! It’s a clean and fun font and is perfect for any birthday card. I die cut the shadow out of Peacock cardstock, then to tie into the candles a bit, I ink blended Sea Glass, Aqua Sky, Oceanside and Peacock inks on a scrap of paper that I die cut the ‘make a wish’ out of. I love how this turned out! The card as a whole feels very cohesive, which is always a bonus. To add some bling, I added two groupings of Rock Candy sequins from Trinity Stamps.
Rainbow Candles Birthday Card
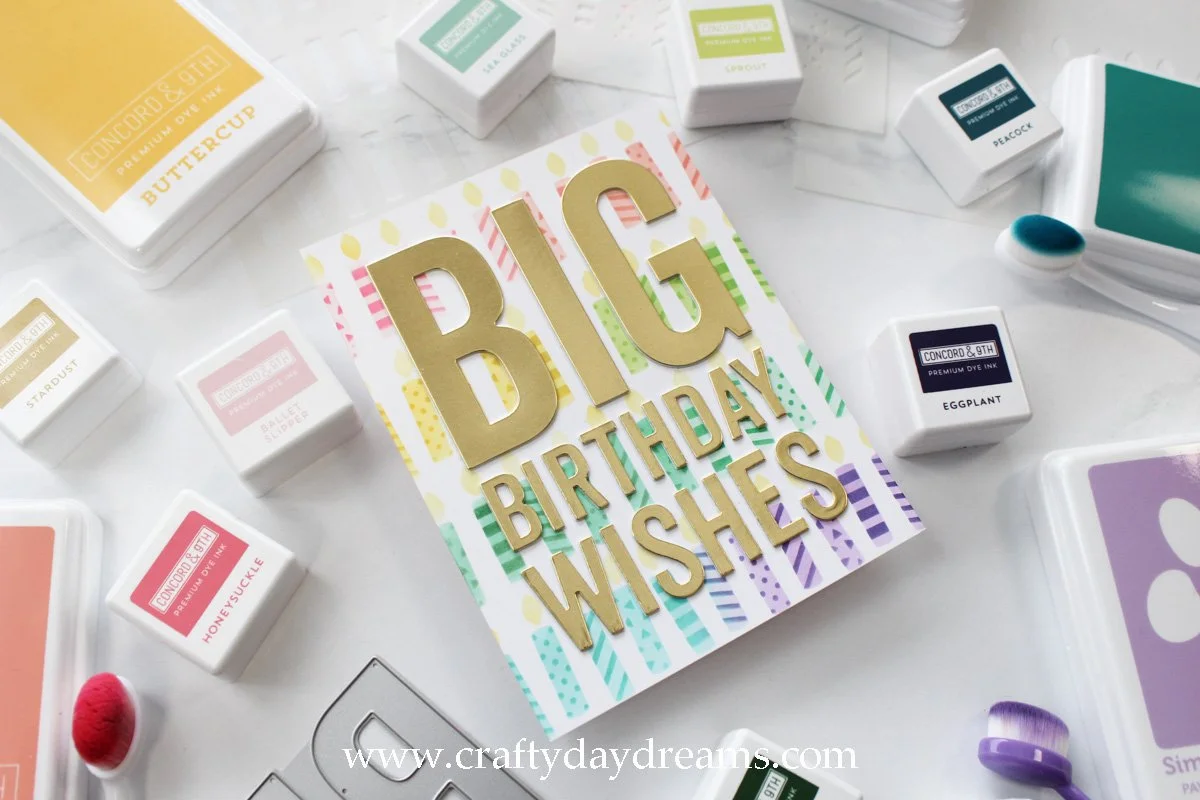
I had a lot of fun on this card! And used almost every ink from Concord & 9th to complete the rainbow haha. I broke each row into two colors and it worked out that there would be about 5 candles in each color. I started off with Ballet Slipper and Grapefruit for the top row, then Buttercup and Sprout, Clover and Sea Glass, then Aqua Sky and Lilac (from Simon Says Stamp) to finish the first stencil off. For the detail stencil, I went a shade darker on each so for the first row I used Honeysuckle and Sorbet, then Stardust and Parsley, Evergreen and Clover, and Oceanside and Eggplant. I love how this really made the details pop off the candles. I was aiming for this panel being light and bright, so I lightly blended on Buttercup ink for the flames (though I do wish I went in with a little bit of a heavier hand in spots).
I decided to leave this panel as A2 size since I wanted to use the Big Birthday Wishes die from My Favorite Things on this card. This die is the epitome of quick birthday cards! I ended up making a template with an A2 sized piece of regular white cardstock in order to lay my letters down perfectly straight. I had two layers of white cardstock letter, then topped them off with matte gold cardstock from SSS. I love how the gold pops on this card!
Purple Shaker Birthday Card

I decided I wasn’t done playing around with the Layered Candles stencil set so I have one more fun birthday card to share with you! For this one I really wanted to blend at a diagonal, so I started off by blending Ballet Slipper ink in the top left corner of the card, the Honeysuckle, Lilac (SSS) and Eggplant. For the detail stencil I used the same colors but applied them with a heavier hand since I didn’t have a darker purple than Eggplant or an ink darker than Honeysuckle. I really love how this blend turned out! It feels so fun and playful!
To make this card different from my first, I decided to make a shaker card out of it using the shadow die from the Make a Wish greeting on my 3.75 x 5-inch panel. I cut a small square of acetate that was slightly larger than the opening the shadow die cut out and glued it down. Since I wanted to inlay the stenciled fall out piece, I trimmed down a backer piece of white cardstock to the same dimensions as the stenciled panel, lined up the fall out piece in the window and stuck it to the backer piece with some repositionable adhesive. Once I checked that it was aligned correctly, I gently lifted the edges of the stenciled shadow piece (the part I’m inlaying—sorry if my explanation has gotten a little confusing here) and added drops of glue to it to give it a stronger hold.
I made the walls of my shaker with foam strips from Concord & 9th—I love these, they’re thin and the perfect height! I added Rock Candy sequins from Trinity Stamps into the shaker well and pulled off the adhesive liners. Now is a great time to remind you to add foam to the rest of your panel before sticking your stenciled panel onto it! Because trying to add foam once the top half is stuck down is not fun—ask me how I know 😅.
With the shaker part assembled, I decided to mat it on a piece of Eggplant cardstock that I used the Stitched Hearts cover plate from Concord & 9th on. When the card is assembled, you don’t see much of the hearts, but I liked how it looked more than with the Stitched Polka Dots cover plate, and I didn’t want to use the same one as the first card. Now that the card was basically complete, I finally decided on the color of the words for the Make a Wish greeting, which I die cut out of Concord & 9th white glitter paper. I die cut a second one that I colored with an alcohol marker to get a custom colored glitter cardstock but decided just to stick with the white. Did you know you can color on glitter paper with alcohol markers? It’s something that I tend to forget to do!
To finish this card off, I again added some Rock Candy sequins in pretty much the same way as I did the first card. I like this simple arrangement, and at least that way I didn’t have to fuss around too much to figure out where to put them.
Well, that wraps up this post! I hope you liked these cards, I really enjoyed putting them together, especially with how quick they came together! Thanks for stopping by the blog today, I hope to catch you next time with more inspiration! 😊