

Ellen Hutson—Vintage North Pole Postcard
Happy Thursday, Crafters!
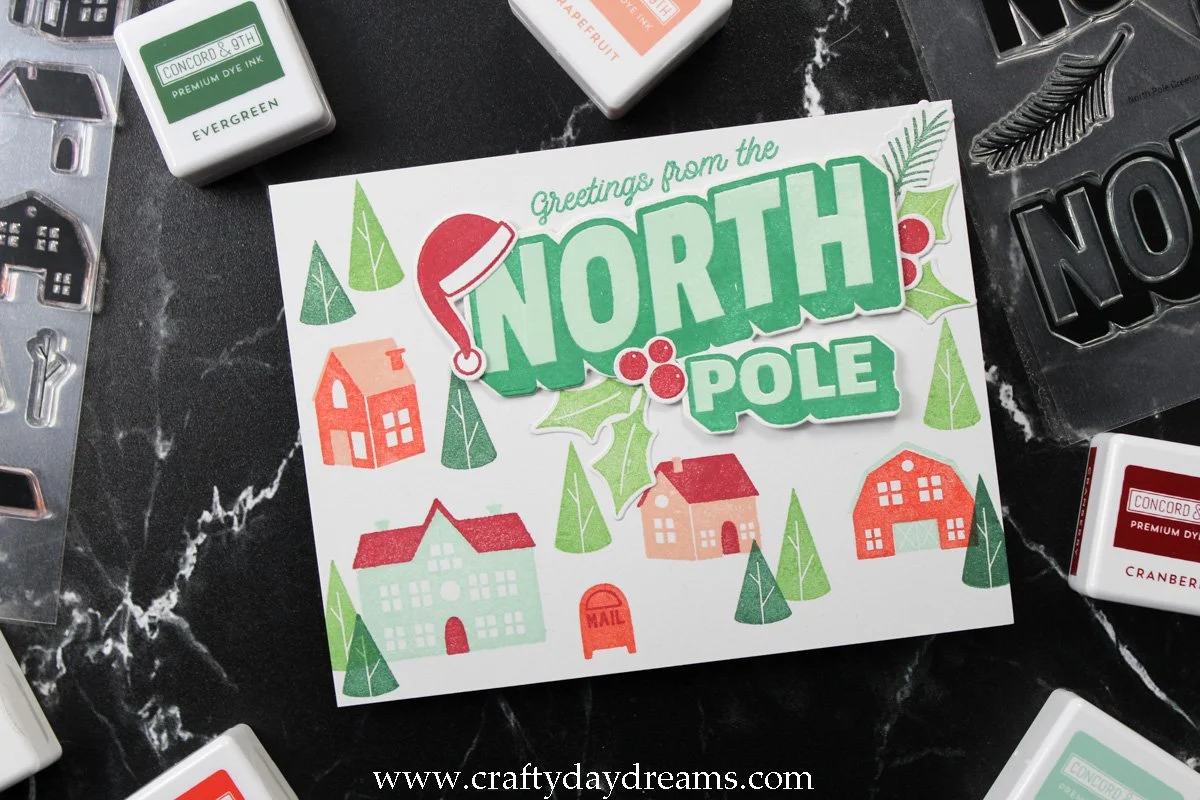
Today I’m sharing a cute, vintage Christmas card with postcard vibes. This whole card features just two products, and both of them are from the Essentials by Ellen holiday release. These products, the North Pole Greetings and Christmastown stamp and die sets, are so fun to use and so well designed! I had a lot of fun putting this card together, and I’m really happy with how it turned out. This card turned out to be a mostly one-layer card with the exception of the die cut ‘North Pole’, but it could be made a true one-layer card with a simple change and some masking!
One piece of advice before I get into all the details is if you are an overthinker like me, you might want to do a test run of your card. I get a bit anxious when I have to stamp things out like this card because of color combinations and positioning, so stamping out my design on scrap paper really helps! Not only does it allow you to confirm what you like and change what you don’t, it’s a great way to quickly line up stamps in your MISTI once you know where you want them. And best of all, it’s just paper! So if you mess up, it’s not a big deal.
Once I had my design planned out, I got to stamping on my card front. For this project, I used all Concord & 9th inks since I’m very familiar with them and I have the full set, but you can use any inks! I stamped the buildings in a weird order, but I started with the factory looking one and used Sea Glass ink for the body, and Cranberry for the roof. I stamped the mailbox to the side of it in Poppy ink and the ‘mail’ details in Cranberry ink. Next, I stamped the barn in Poppy and the roof details in Sea Glass to pull that color to the right side of the card front. Then I moved on to stamp a house between the barn and factory in Grapefruit ink with a Cranberry roof. At this point, I filled the area in with trees and stamped them Parsley and Evergreen inks, being sure that if I was going to overlap trees that the Parsley tree was the one being stamped over with Evergreen ink.
Once I had trees added, I decided to carry the scene up the left side of the card a bit more. I stamped a Poppy colored house and added a Grapefruit colored roof to it. I filled the rest of the space in with a couple more trees, then got to work on the sentiment.

I had previously stamped and die cut the ‘North Pole’ greeting using Sea Glass ink for the inside letters and Clover for the shadow on the letters, and having this pre-cut and ready to go really made figuring out the sentiment super easy. I positioned it where I wanted, then lined up the ‘greetings from the’ stamp above it and stamped it in Clover ink. Once that was stamped, I realized there was still a bit of space that felt too empty to me, so I decided to stamp the supporting images from the North Pole Greetings stamp set. I stamped the Santa hat and the berries in Cranberry ink, the holly leaves in Parsley, the evergreen sprig in Evergreen ink, and die cut them all with the coordinating dies. I fussed with the arrangement of the greenery, tucked it all under where my greeting would go, and glued it down. I also glued a set of berries on the right side underneath where the greeting would go so that it looked different from the left side. On the left side I decided to glue the berries on top of the greeting because I like the pop that brought to the card. I popped the greeting up on foam squares and glued the berries and the Santa hat onto it.
I really like how this card turned out! I love the vintage feel it has, I seem to be more and more into the retro Christmas decorations lately. What’s your favorite Christmas decoration style?! Thanks for stopping by the blog today, I hope to catch you next time with some more Christmas inspiration! 😊