

Ellen Hutson—Cake Day Gender Reveal Card!
Hello, Crafters!
Today I’ve got a fun card for you! When I was using the Cake Day stamp and die set last week, the thought of turning a birthday-themed stamp set into one that could be used for a baby gender reveal announcement popped into my head! I like that this stamp set could be used for any celebration that involves cake: weddings, birthdays, babies, new jobs, or just a pick me up! I don’t know of any cake lovers that would complain about getting a cake-themed card in the mail ‘just because’!
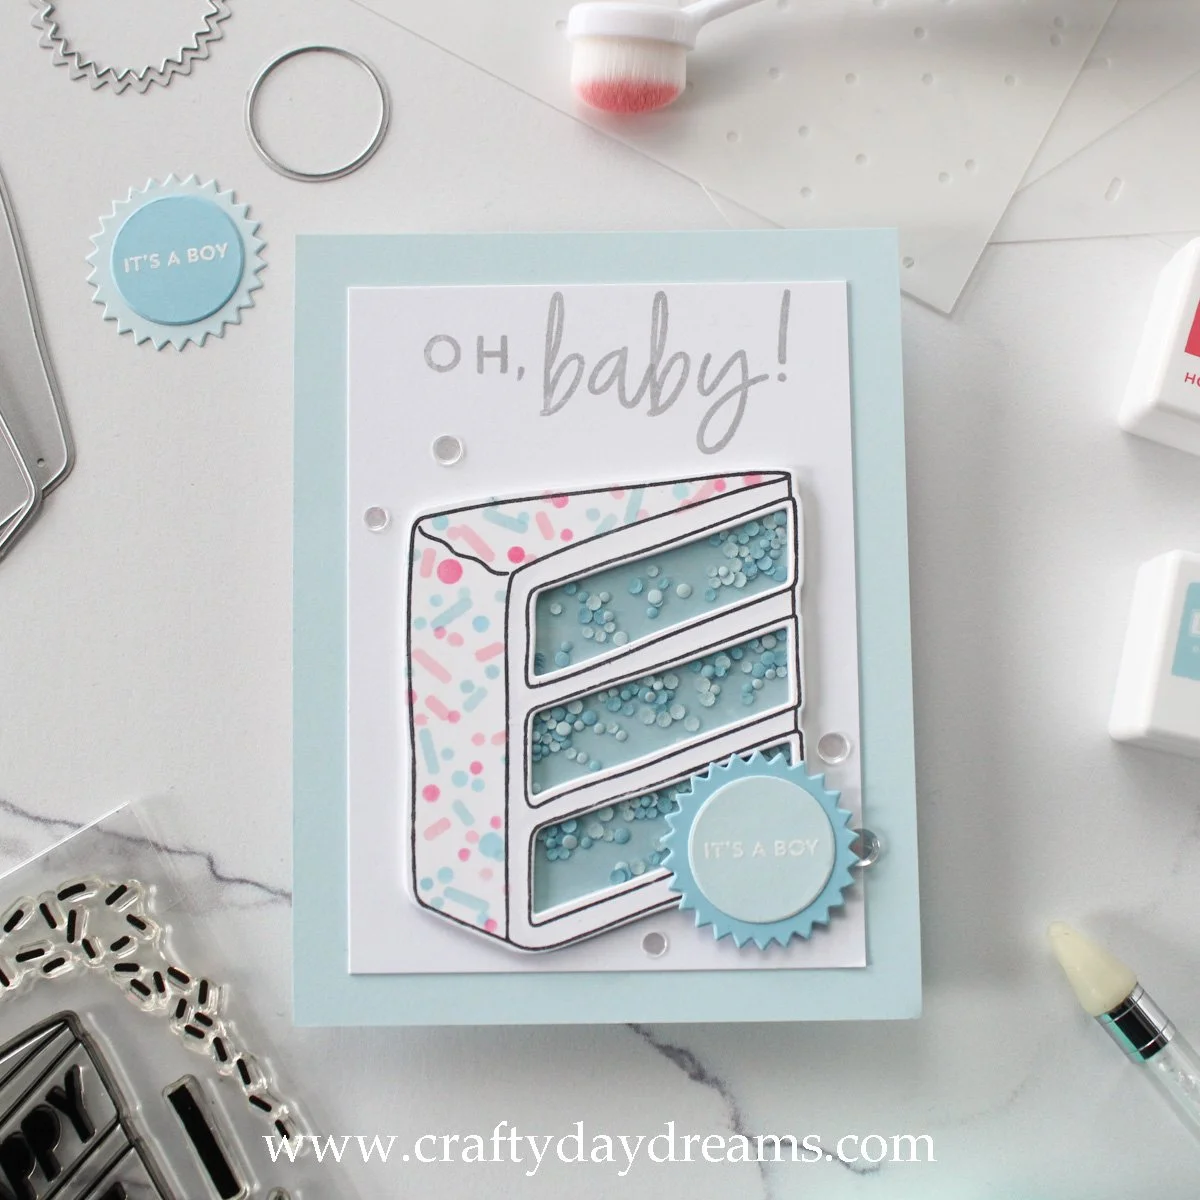
So onto the details! I started this card off by working on the cake. I die cut a panel of plain white cardstock with the cake outline die but held onto both the cake that it cut and the negative piece of paper. I popped the negative piece into my mini MISTI and used some repositionable adhesive on the back of the cake slice to pop it into place. I made this jig so I could easily stamp my cake layers, and eventually my cake outline with ease, and it truly does make it a breeze! With my cake in place, I die cut a cake using the shaker window die (I’m calling it this—it’s the cake with the layers die cut out of it) so that I could use it as an alignment guide for stamping.
I lined the cake layer stamp up, and after repeating this three times (not because of mistakes but because of indecision on color 😂), I decided that all of my layers would be stamped in Powder ink. I set the cake aside and die cut another shaker window cake, this time out of C9 white cardstock, lined it up in the same spot in my mini MISTI, and stamped the cake outline with Concord & 9th black ink. Once this was dry, I stuck my shaker window cake down on my glass mat with repositionable adhesive and masked off the cake layer part with sticky notes so that I could blend sprinkles on to the outer frosting layer. I pulled out Honeysuckle, Pink Lemonade, Harbor, and Powder inks and got to ink blending. I had no rhyme or reason when blending on the sprinkles since my only goal was to fill it up as much as possible and make the sprinkle colors feel balanced. I love these colors together, they make the perfect ‘baby boy/baby girl’ colors!
With my cake basically complete, I got to work on the background and sentiment. I originally planned to use a panel I stamped with a stripe background stamp in Dove ink, but chose differently once I saw the sprinkles on the cake. Instead, I decided to just use a piece of Powder cardstock as my card front and I would mat a white rectangle on top of it. I decided to cut down a piece of plain white cardstock to 3.5 x 4.75-inches and build my sentiment on that. This gave me a nice thick blue border which I felt was perfect!
I had recently picked up the MFT Itty Bitty Baby stamp set from Ellen Hutson (I think this is the only place it’s still in stock, it looks like it’s retiring) and I knew I wanted to use the ‘it’s a boy’ sentiment on this card. Since I really don’t have any baby sentiments besides this stamp set and they’re on the small side, I had to make my own. So, I pulled out the Little Letters and Lovely Letters stamp sets from Concord & 9th and stamped out ‘oh, baby!’ in Dove ink. I think this sentiment pairs perfectly with the ‘it’s a boy’. To make things a little more interesting, I pulled out two dies from the Hip Hip Hooray die set from Concord & 9th that allow you to make a ribbon. I die cut the spikey circle out of Harbor cardstock and the plain small circle in the die set out of Powder. I lined up the ‘it’s a boy’ sentiment and heat embossed it in white on the Powder circle, which I glued on the spikey circle.
At this point in the card, I thought things felt too plain, so I decided to make a shaker out of my cake pieces. I cut a piece of acetate with the cake outline die and glued it behind the cake shaker window piece. I decided to add some subtle shading to the frosting layers on the inside of the cake, so I pulled out my lightest cool grey alcohol marker (CG II 00 for Ohuhu) and went alongside the side of the cake and under each cake layer. I die cut 6 layers of the cake shaker window out of plain white cardstock and glued them together on the stamped cake layer piece to build up the shaker walls. For shaker fill, I used the small confetti dots die from the Cake Day die set and cut it out of Powder and Harbor cardstocks about 4 times each. I love having my Bitty Buzz Cutter for small die cutting like this! It makes it so much less of a hassle than using my Platinum 6. With my shaker wells filled to my liking, I glued the top of the cake on. This makes such a cute, fun shaker!
I glued the shaker to my card front, centering it as much as possible. I added some thick foam squares to the bottom of the ‘it’s a boy’ sentiment since the other half of it was the same height as the shaker (glue was added to the upper half) and stuck it down. To finish off this card, I decided it needed a little bit of sparkle, so I pulled out my Rock Candy sequins and added five to it. I love the shine these bring, and I think they really help the card to feel completed.
I hope you enjoyed this card! I had fun putting it together, even if I got a little stuck at times! Thanks for stopping by the blog today, I hope to catch you next time with more inspiration! 😊
Affiliate disclaimer: all links to Waffle Flower, Altenew, Scrapbook.com, and Spellbinders products are affiliate links. These links allow me to get a commission at no extra cost to you if you use them to shop! All other links provided are links to supplies and shops I am not affiliated with and I do not get a commission from.
