

The Stamp Market—XOXO Stamp Three Ways!

Happy Thursday, Friends!
We are getting closer to Valentine’s Day, and I’m feeling the pressure to pump out more cards! I picked up a bit of new Valentine’s product this year, but it seems like I haven’t gotten to all of it, so I guess next year I’ll just have to start earlier!
Today’s post focuses on the XOXO background stamp from The Stamp Market. My sweet crafty friend Jan (her IG handle is @sandboxcards — check her out! She’s awesome!) sent me this stamp after accidentally ordering two, so I had to make some cards with it! I was actually hit with a lot of ideas when I got crafting which could be why my photos aren’t too great—running out of daylight. Background stamps are one of my favorite things, so these are my general ideas when it comes to them:
Fun embossing powders: I love when I can break out my less used (all those that aren’t gold and white) embossing powders for a fun look. I actually heat embossed a rose gold version of this stamp but didn’t get to use it! But why not bring out all your fun powders and see what shakes out!
Emboss resist: this is my favorite technique with any background stamp! It makes fun and quick work of a card front and packs on the color!
Fun stamping: I’m one to admit that when it comes to background stamps, I typically heat emboss them. However, stamping them in multiple colors (like I did in my second card) can result in a playful and colorful look! Background stamps don’t have to be all the same color!
Patterned paper: going along with that last bullet point, to me, background stamps are just a tool you can use to make your own patterned paper. You can create something to your liking by employing different techniques, or you can die cut things out of your background panels. Think eclipse technique, die cutting large shapes (hearts, stars, circles), DIY wrapping paper—the opportunities are endless!
and lastly, a jumping off point: I love to use background panels as a jumping off point for large greetings, this makes for a very quick card!
I love how versatile background stamps are, so I hope you enjoy the three cards I made with the XOXO stamp!
Graphic XOXO

I love the graphic look this card has! After seeing a Concord & 9th instagram post where they stamped a Turnabout in all black, I got the graphic bug! So I black heat embossed the background stamp on plain white cardstock with Simon Says Stamp Ultrafine Black embossing powder. I love this embossing powder, it’s gives you a juicy embossing and melts so well. Originally I had the idea to pair this panel with one I heat embossed in rose gold embossing powder by overlaying a die cut heart of the rose gold panel over the pattern on the black panel, but I changed my mind. Instead, I decided to use the inner frame of the largest Stitched Scallop Rectangle die set from Pinkfresh Studio to add a frame element to the card front.
From here, I decided I wanted to use the stacked ‘LOVE’ die from Concord & 9th’s All the Love die set as the focal sentiment on the card. Once I die cut it out of Honeysuckle cardstock and laid it on the card front, I felt the background was too overwhelming to the eye. So, I pulled out my heavyweight vellum from SSS and cut a piece down to the size of the scalloped frame and glued it on the back. At this point, I glued it down to my card front only using glue around the outer edge of the vellum so the rectangle frame would hide the adhesive. However, if you really want the vellum to make contact on more of the card front, build your sentiment on the vellum piece before gluing it on the card front so that you have more contact points to hide glue!
I added a white cardstock layer to my Honeysuckle ‘LOVE’ for dimension and glued it down as even/straight as possible. Once I had it on the card, I decided to die cut the ‘you’ from the same C9 die set out of SSS matte gold cardstock, and I glued it down in the middle of the ‘LOVE’. Dare I say I really LOVE how this card turned out? 😂 I really like the graphic look to it since it’s not something I do too often, but I would like to do more! You could definitely add a sentiment strip or sequins to this card to finish it off, but I decided to leave it as is.
Ombré XOXO

I had so much fun with this card! This past summer I made a card with the Woven Stripe background stamp from Concord & 9th with C9 Summer Camp products where I stamped each double line of the stamp in a different ink color. When brainstorming with this background stamp, it reminded me of that card. So, I decided to make a pink to red ombré background. I started off by stamping the first row of the stamp in Ballet Slipper ink while masking off the row below with a large post-it. I moved on to Grapefruit ink while masking off the row above and below. I continued this masking working my way down thru Sorbet, Honeysuckle, Poppy, and Cranberry.
While waiting for the ink to dry, I dug through my stash of die cuts and pulled out a set of frames from the Stitched Scallop Rectangle die set from Pinkfresh Studio. For this card, I decided to use both the inner and outer portions of the largest frame, but I decided to add more dimension. The outer frame that I pulled from my stash ended up being 2 layers thick, so I decided to add three layers to the inner frame. I like that this added a bit of depth and dimension to the card. With the frames glued on the card front, I got to work on the sentiment. I decided to die cut the second largest heart from the Essential Hearts die set from Ellen Hutson out of Ballet Slipper cardstock. I glued the heart onto the card front and die cut the ‘love’ die from the All the Love die set from Concord & 9th out of the same SSS matte gold cardstock and glued it on top of the heart. I finished the sentiment off with a ‘love your guts’ sentiment strip I had left over from heat embossing the Valentine Vibes stamp set last week.
I really like how soft and light and airy this card turned out. Again, I decided to hold off on sequins, but this card would look good with them too!
Oxide Resist XOXO
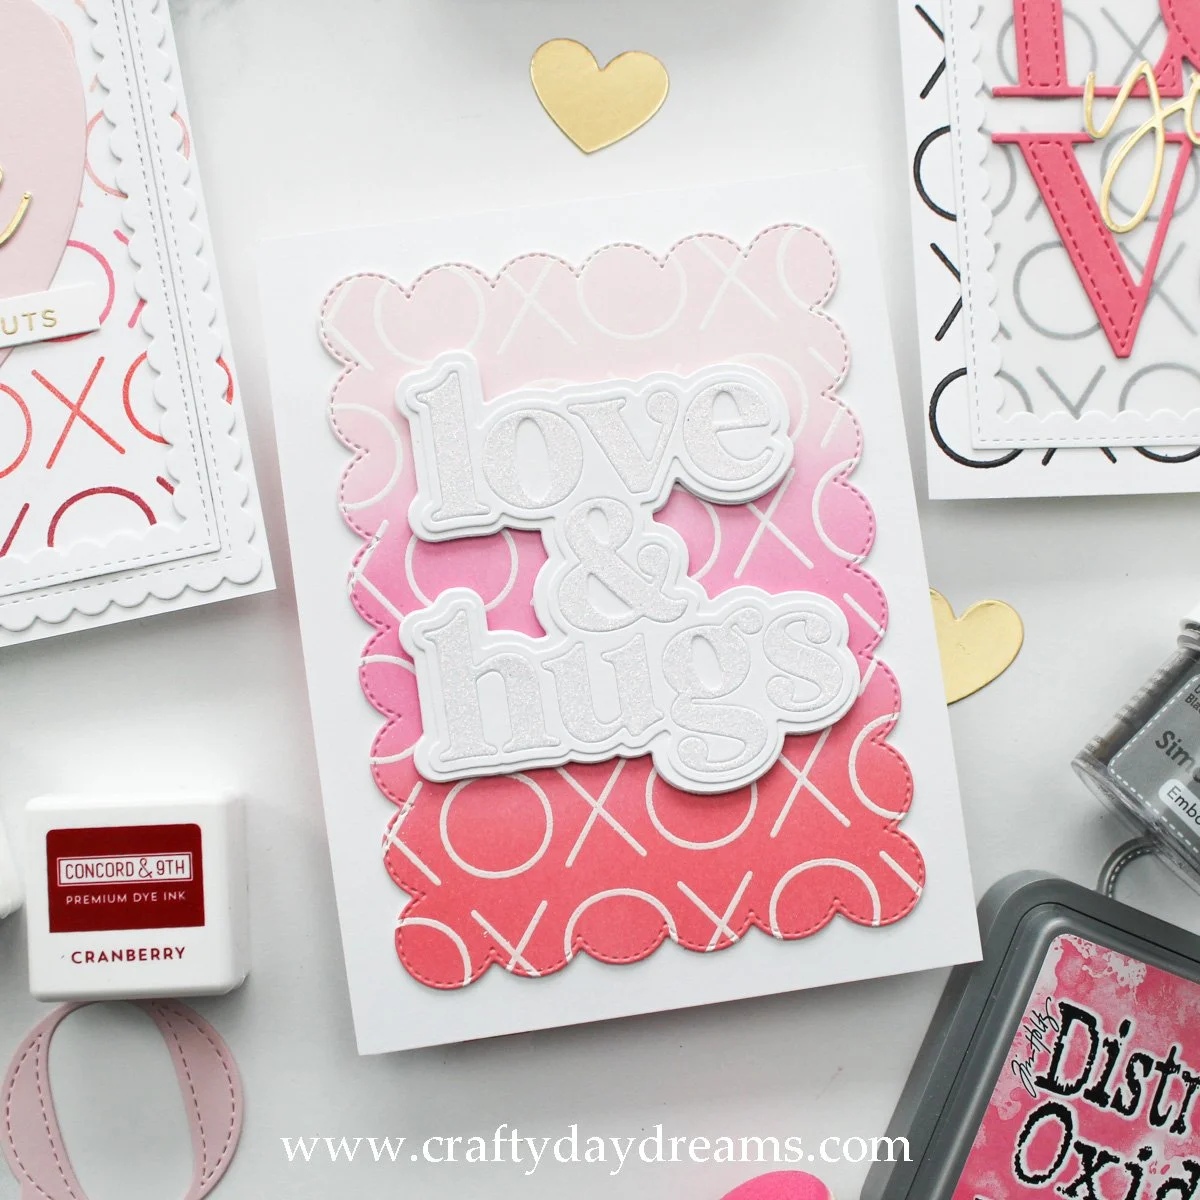
Now onto our last card! This one features oxide resist, which if you follow the blog, you know is my favorite! What’s a better way to create a Valentine’s card than with a Valentine’s themed ink blend? For this card, I white heat embossed the XOXO stamp and made a linear blend of Spun Sugar, Picked Raspberry, and Festive Berries on C9 white cardstock. Once the panel was blended, I had the idea to use the ‘love & hugs’ greeting from the Sweet Sayings die set form Concord & 9th’s January release. I ran the die thru my Platinum 6 with plain white cardstock, then with C9 white glitter paper. I decided that I would use the white glitter paper for the letters, and leave the rest of the greeting white.
Once I had everything adhered to the shadow layer, I decided to die cut another shadow layer to add a little strength to the die cut, but really for more dimension (I wasn’t sure I would be using foam tape at this time). When I placed the die cut on my blended panel, I thought there was too much empty space around it, so I decided I would die cut the panel with the scalloped rectangle from the Simply You die set from Concord & 9th. I die cut an additional scalloped rectangle from plain white cardstock and glued it behind the blended panel, then glued it onto an A2 sized piece of white cardstock. I love the clean white borders around the blended panel!
I popped the greeting up on foam squares and stuck it down on the blended panel as evenly as possible. I really love the pop the white glitter adds to the card! Just like the other two cards, I thought about adding sequins or a subsentiment to this card, but I decided against it.
I hope you liked these cards! I had a lot of fun making different cards with one background stamp, it makes it feel like a fun challenge. Thanks for stopping by the blog today, I hope to catch you next time with more Valentine’s inspiration! 😊