One Press Plate, Three Ways! Altenew March 2024 Blog Hop + Giveaway!
Hi Crafters, welcome to my blog! I’m so excited to be hopping with Altenew today highlighting their March release. If you haven’t seen this release yet, I suggest you check it out! There are products for everybody!
Want to see the supply list and giveaway information? Check out the bottom of this page!
Today’s post is going to focus on the Rustling Leaves product suite. This includes a BetterPress Press Plate, coordinating dies, a coordinating stencil, and a 3D embossing folder. When I created these cards, this was only my second time playing with my BetterPress. It’s a quick to learn system that yields wonderful results, and I would highly encourage you to try it out if it interests you! I’m hoping to get up a YouTube video on these cards, but I am quite literally about to be making a cross country move in 2 days! So, stay tuned for that content if that would interest you!
I had so much fun playing with the Rustling Leaves products that I decided to create cards three different ways to show you some different looks and the versatility of these products. As you can see, each one surely has a different vibe!
French Blue
I don’t know what it is, but I am absolutely head over heels for blue ink on white cardstock right now, so that’s what inspired me for this card! I decided to use the larger leaf press plate and I lined it up on the lower half of the BetterPress chase (the magnetic platform) along the thick black grid line. I pulled out an A2-sized piece of white cotton BetterPress paper and taped it to the platen with some easy-see tape. I pulled out French Blue BetterPress ink, inked up the press plate, snapped the platen in place, then ran everything through my Platinum 6 with 2 shims. You might not need to use shims, it all depends on your machine and the depth of the impression that you want.
I’m not lying when I say this, but everytime I run a press plate through my machine, the result always makes me smile! It’s such a wow moment when you look at your results! I repeated the inking process of the press plate, then rotated my platen 180 degrees so I could press the other half of my panel. As you can probably tell, my impression isn’t perfect. I obviously missed a couple spots with my inking (I could have re-pressed those spots), but I decided to leave it be since the impression was still pretty clear. By this point, I knew I wanted to make the sentiment a focal point, so I die cut two circles from a nesting circle die set from Simon Says Stamp. I wanted to lean into the blue a bit more, so the larger circle was die cut out of Hero Arts Lapis cardstock (which is unfortunately not sold anymore, so sorry about that! I was unaware until I was linking products), and the smaller circle out of the same BetterPress cotton cardstock. I used BetterPress black ink for my sentiment and used the coordinating die to cut it out.
My sentiment circle was feeling a bit sparse, so I decided to use the smaller press plate and press two leafy sprigs in the same French Blue ink and cut them out. I popped the sentiment up on some thin foam squares in the center of the white circle, then arranged the blue leaves around it. Once I was happy with the leaves, I glued them down and cut the excess off. At this point, I decided I wanted a vellum belly band to really punch up the sentiment being a statement/focal point, so I pulled out some heavyweight vellum from Simon Says Stamp and cut it to be about 1.5-inches wide. I added some double sided tape to the ends of the vellum strip and folded them behind my panel. I glued the white circle on top of the blue one then popped the whole thing up on thick foam squares and stuck it on the middle of the vellum band.
To finish this card off, I decided more blue and sparkle was needed! I pulled out my Rainbow Pearls 2 multicolor pearls set from Pink and Main and glued down small light blue pearls that matched the ink fairly closely. Not too shabby for this card!
Lush Leaves
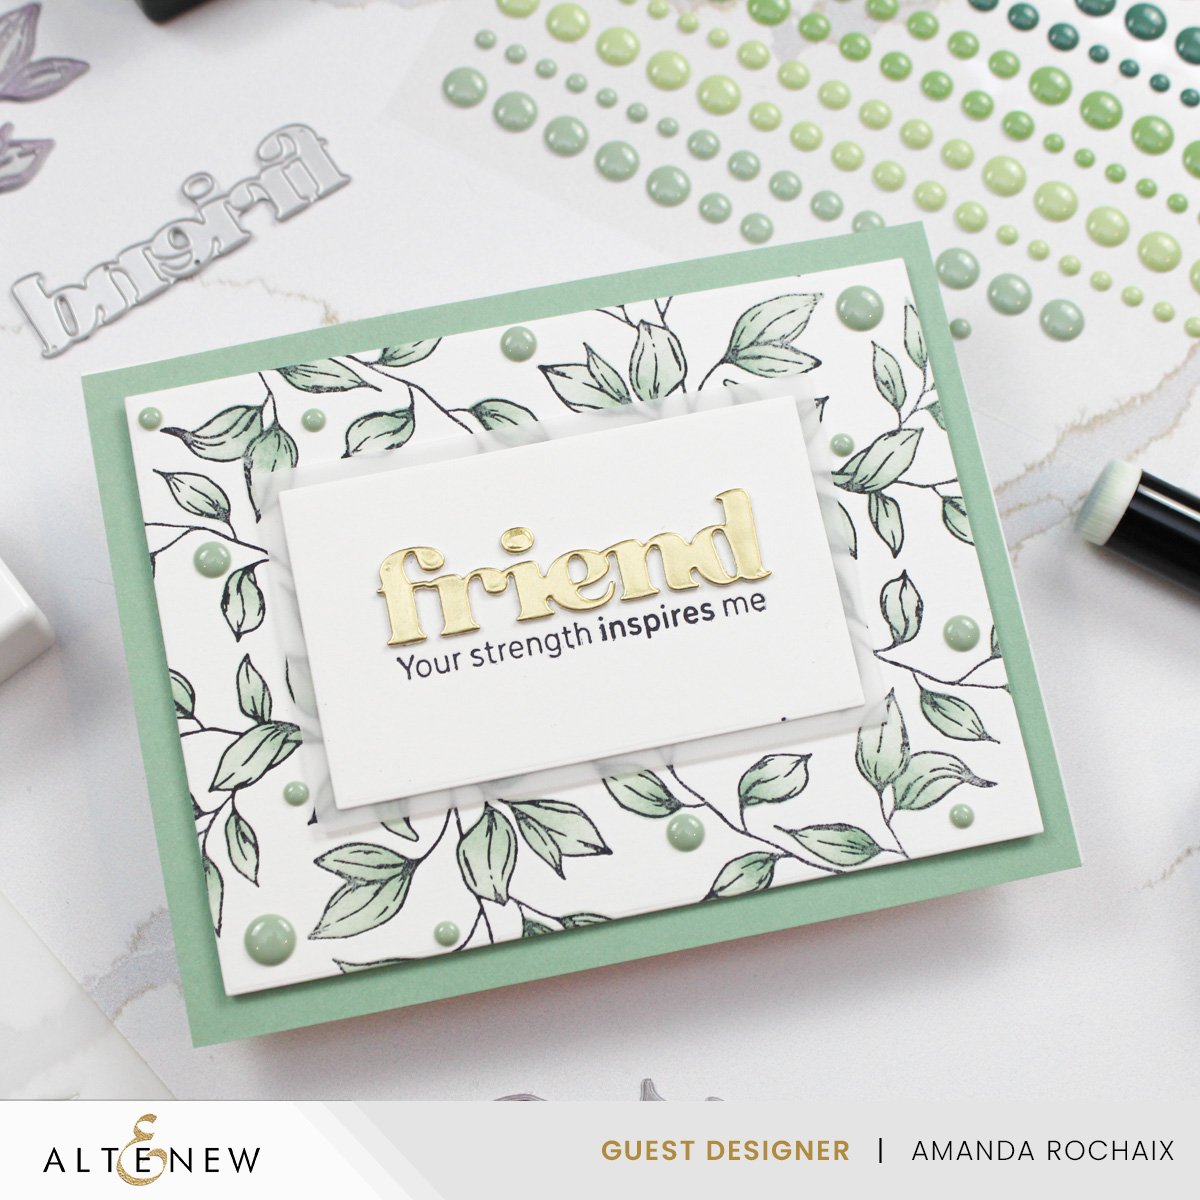
I love how lush and green this card turned out! For this one, I wanted to go in a different direction than the first card, so I decided to fill up a background with leaves and color them in using the coordinating Rustling Leaves Stencil. For the alignment of the press plates, I kept both of them under the thick line that cuts through the A2-sized template on the BetterPress chase. I arranged the larger, fuller press plate to kind of swoop over the card front and fill in a lot of area and used the smaller press plate to fill in the gaps. Then I inked them up with BetterPress black ink and pressed them. Just like last time, I re-inked the plates and spun the platten 180 degrees to fill in the other half of the cardstock.
I lined up the stencil on each leaf cluster and first blended on Jade fresh dye ink, then added a little bit of depth to the base of the leaves by adding Eucalyptus fresh dye ink with a Waffle Flower 0 shader brush. This hint of dark green really adds such a punch to these leaves, I love it! At this point, I decided to make this card a landscape orientation with a mat, so I trimmed my panel down 1/4-inch on each side. Luckily, Sage cardstock from The Stamp Market matched these greens pretty perfectly, so I popped my leafy panel up on some foam strips and stuck it down.
For the sentiment, I was feeling a rectangular focal point, so I used two nesting dies to cut a larger vellum rectangle and a smaller rectangle out of BetterPress paper. Before cutting the BetterPress cardstock, I did press my sentiment on it in black ink, then cut it out with the rectangle die which made it easier to ensure that the sentiment was centered in the rectangle. For the rest of my sentiment, I pulled out the Versatile Greeting die set and die cut the ‘friend’ out of matte gold cardstock. I stacked up a couple more diecuts behind it and glued it down above my pressed subsentiment. I popped the sentiment rectangle up on some thin foam squares, then stuck it down on the center of my stenciled panel.
To finish the card off, I pulled out the new Frosted Foliage enamel dots and popped them around the card to fill in some of the white space. I love what these dots add to the card! However, if you don’t have them, some gold splatter (or black or green) would be perfect too!
Vampy Vibes
Now this card, I think this one is my favorite of the three I made! She’s a beauty, isn’t she?! I wanted to take this card in a different direction from the last two and create a card that’s a little ‘non-traditional’ and maybe not something that you would think of when it comes to leaves (I mean— I immediately thought of green leaves, so this card definitely takes things in a different direction!).
I wanted to step a teeny bit out of the box with this card and showcase other ways to use these press plates. My focus with these three cards was to show the versatility of these plates specifically, but also press plates in general. So, because of that, I decided to foil my sentiment using the press plate, and I decided to use fresh dye ink to create my leafy impressions. I wanted to show that you don’t have to go all out with your shopping, and that you can create fabulous things without a BetterPress (and instead using the plates with a hot foil machine), or you can save some money by using inks you already have instead of buying all the BetterPress inks. That all said, let’s get into the details on this card!
For this card, I started off by running an A2-sized piece of Hero Arts Plum cardstock and the Rustling Leaves 3D embossing folder through my Platinum 6. I love this embossing folder! For one, it’s gorgeous, but I also love the raised circle outline in the middle of it. This outline tells you exactly where to put your sentiment while also giving it more impact—yay for some mindless crafting time! To darken up the outer edges of the cardstock some more (and add a bit more drama), I blended on some Cosmic Berry fresh dye ink around the edges of the Plum cardstock.
I wanted the embossed circle to stand out from the background a little bit more, so I pulled out Gold Rush Lunar Paste and rubbed it around the circle, trying my best to keep from touching the non-raised area of the cardstock. However, I wasn’t too successful, so I cheated and die cut a circle to cover up my stray Lunar Paste. This is totally something you could skip doing, but I thought it was too noticeable and decided to cover it up.
Next up, I worked on my sentiment. I used Concord & 9th white cardstock and Champagne Glimmer foil and foiled the ‘love you so much’ sentiment on a circle that was a little bit smaller than the inside of the gold outline. I pulled out the Versatile Greeting die set again and die cut the ‘hugs’ out of matte gold cardstock and a couple layers of white cardstock to add some dimension. I glued the ‘hugs’ down just above the foiled sentiment, then popped the circle up on some thick foam squares and stuck it down. I love the impact that this dimension has here!
By this point, I felt that I needed some more leafy sprigs on this card to fill in the bare corners a little bit. I decided to experiment with using fresh dye ink instead of BetterPress ink for my impression since I haven’t tried non-BetterPress inks yet. I pulled out Cosmic Berry fresh dye ink again, and quickly made two impressions with the largest press plate and die cut them out. One thing that I would recommend if you’re not using BetterPress inks is to use ink pads with a felt pad vs. a foam pad. The felt pad, I feel, makes it easier to get the ink where it should be because there’s a little bit of resistance when you ink up compared to using a foam pad that could be a bit too squishy. Once I got my purple sprigs where I wanted them, I glued them down, then finished the card off by adding some dew drops in various sizes. I really love how this card turned out. It’s elegant, vampy, and in my opinion, perfect haha!
That wraps up this post! I wanted to say thank you for stopping by the blog today and taking the time to read my mini novel haha! Also, a big thank you to Altenew for inviting me to guest with these amazing products! And as a reminder, I do hope to get a video up on these cards once we get settled out of state.
Blog Hop List:
Hop along to visit these amazing designers!!


